How to – sew awkward fabrics

Have you ever spent a small fortune on an amazing fabric? But then it’s just sat in your fabric stash, because it’s ‘too difficult to work with’? Or worse still, you ruined it?
Sometimes challenging fabrics can be too much to handle, even for experienced crafters. From cutting to folding, even simple tasks can be frustrating – and that’s before you’ve got them onto the sewing machine.
With a bit of practice, the right tools for the job, and these handy tips, you’ll be sewing with those awkward fabrics in no time.
Walk this way
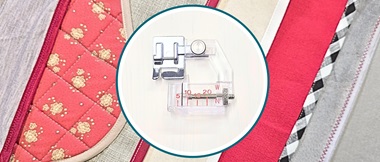
When sewing with any difficult fabric it is worth investing in a walking foot. Your machine may come with one already, or you can pick one up from your dealer, haberdasher or online.A walking foot has extra feed dogs on the bottom of it. This means there will now be feed dogs either side of the fabric, which will help to pull the material smoothly through the sewing machine. You can see a walking foot in action in our How to quilt as you go video.

Pins and needles
Another thing to consider is your needle. The standard universal needle may be too thin or thick.
When choosing a needle you can either do it two ways:
- Needle size – the lighter the fabric you’re using, the smaller the needle size you should use (likewise use a bigger needle the heavier the fabric).
- Specific needles – for fabrics like denim, jersey, knits and leather.
The other thing you need to consider is whether your needle is new and sharp. If you have used your needle many times it will become blunt, especially with heavy fabrics. Blunt needles will pucker and tear your fabric – not good when it’s an expensive silk or velvet.

Slippy fabrics like spandex often move about when you’re sewing two pieces together. It’s a good idea to pin your pieces together. If you’re pinning very delicate fabrics, make sure you use silk pins rather than regular pins, so you don’t snag your fabric. For delicate fabrics that you’re worried about making holes in you can use fabric clips instead of pins.
Stitch it up
Different materials may require different types of stitches.Corduroy and piled fabrics – lighter corduroys can be sewn with a 70/10 needle, but may need up to a 100/16 for the heavier weight fabrics. Like the needle, the stitch length depends on the fabric weight – 2mm for lighter corduroys and 3mm for heavier ones.
For a good finish hold the fabric taught and always sew in the nap. Topstitching looks great on corduroy, but can get lost in the ridges, so use a heavier topstitching yarn and a stitch length of 3.5 to 4mm.
Demin and heavy cottons – cotton rich fabrics like denim tend to shrink and lose colour so always wash these before you start sewing.
Make sure you hold the fabric firmly in front and behind your needle and avoid pushing or pulling as you feed it through your machine. You should also use a specialist denim needles as they’re much stronger and minimise needle deflection, broken needles and missed stitches.
Furry fabrics – these can be difficult to sew as the long hairs can get caught in your stitches.
Gently brush the fabric first so all the fibres are laying in the same direction, then use a double row of long stitches for every seam. Make sure you use a coarse thread to securely grip the fragile fabric backing.
Knits, spandex and lycra – needs a stitch that can move with the fabric, so you need to choose a stretch stitch like zigzag, overcasting (knit) stitch or triple (straight stretch) stitch.
Leather – use pure nylon or polyester upholstery weight thread and use a standard straight stitch. Make sure you use a brand new leather needle. Don’t pin leather, use clips instead – any hole you make will be permanent!
Silks, sheers and satins – need a small straight stitch. Sewing silks and satins can be especially difficult, so it’s worth placing a layer of white or unbleached tissue paper above and below your fabric. You won’t be able to backstitch at the beginning or end of your stitches, so tie off your threads like you would when hand sewing.
Towelling – this is a notoriously messy fabric as its loops tend to shed everywhere once they’re cut. As a bulky fabric, towelling will need a longer stitch and a heavy-duty needle. You’ll also need to enclose all cut edges, as any raw edge will continue to shed. An overlocker is a good choice for finishing off towelling as it’ll neaten the edges and prevent the fabric unravelling.
Tweeds and woollens – these fabrics can be prone to unravelling so try to handle them as little as possible. It’s also recommended that you stabilise the fabric before you start sewing – lightly iron some interfacing on the back.
Depending on the fabric weight use a 70/10 or a 90/14 needle and a stitch length of 2-3mm. Finish your seams on lined garments with a simple zig-zag or overlock stitch. For unlined garments use a pre-folded bias binding for a professional finish.
Velvet – depending on what weight the velvet is will depend on which needle you need to use. Traditional velvet should be sewn with a 70/10, but heavier or lighter weights will need bigger or smaller needles. Treat stretch velvet like you would a knit fabric.
Best to baste
If you’re sewing a tricky shape or trying to match seems exactly when sewing with an awkward fabric, it’s worth basting before you start to sew on your machine. Some machines have a basting stitch. Or you can baste by hand.Basting takes more time, but it’ll be worth it when you have a perfectly finished project. When basting with silk and satin, use a silk thread, as a poly or cotton thread can snag the fabric.
As with all sewing projects practise makes perfect, so always test your needle, stitch length and type, tension and thread on material offcuts before starting your final project.
With a little bit of patience, planning and practice no fabric will feel awkward to sew with again.