
Mini memory book


Preserve precious memories in this easy-to-make mini memory book, designed by John Bloodworth, The Gentleman Crafter.
Materials needed
- Paper or card (all minimum size A4 or US letter)
- six sheets of 12 x 12 80lb/200gsm cardstock
- nine sheets of 12 x 12 65lb/180gsm patterned paper - Bookbinding glue (low moisture or quick tack glue) or double-sided tape
Equipment needed
ScanNCut hardware
- Brother ScanNCut – Any CM Model
- Standard mat [CAMATSTD12]
- Standard blade [CABLDP1] and blade holder [CAHLP1]
OR
- Brother ScanNCut – Any SDX model
- Standard mat [CADXMATSTD12]
- Standard auto blade [CADXBLD1] and holder [CADXHLD1]
ScanNCut software
General tools
- Ruler
- Manual scoring stylus
- Tweezers (optional)
A note on size:
The book measures approximately 120mm (4¾ inches) wide x 120mm (4¾ inches) tall by 40mm (1½ inches) deep.
How to
Step 1
Download the CanvasWorkspace project file.
Open it in CanvasWorkspace (the desktop version).
Step 2
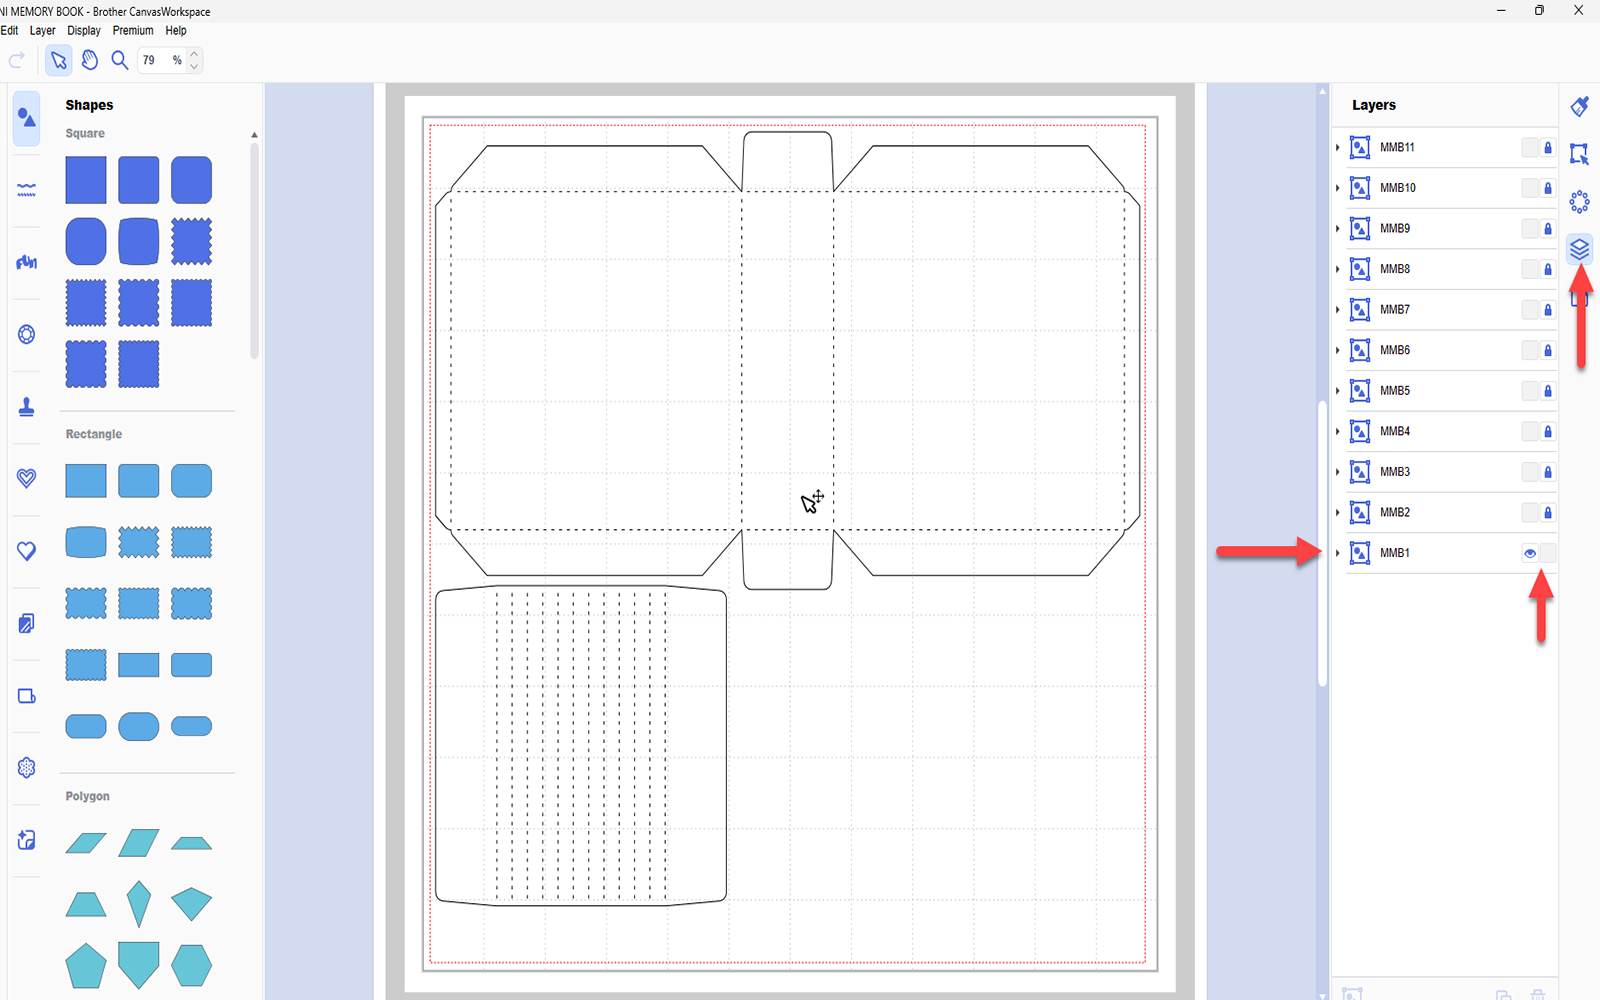
Hide and lock all layers except the one titled MMB1. Transfer this to your machine using the File>Export/Transfer FCM File menu option (using your preferred transfer method) and cut one set. This will require one sheet of 12 x 12” cardstock. This will form the main part of the cover and the spine section to which the pages will be fixed.
Step 3
Hide and lock all layers except the one titled MMB2. Transfer this to your machine using the File>Export/Transfer FCM File menu option (using your preferred transfer method) and cut two sets. This will require two sheets of 12 x 12” cardstock. These will form the pages of the book. You should end up with a total of four pages.
Step 4
Hide and lock all layers except the one titled MMB3. Transfer this to your machine using the File>Export/Transfer FCM File menu option (using your preferred transfer method) and cut one set. This will require one sheet of 12 x 12” cardstock. These will form the inserts that slip into the tops of the pages.
Step 5
Hide and lock all layers except the one titled MMB4. Transfer this to your machine using the File>Export/Transfer FCM File menu option (using your preferred transfer method) and cut two sets. This will require two sheets of 12 x 12” cardstock. These parts will create four pocket/flap combinations and two flip-flap trio page accessories.
Step 6
Hide and lock all layers except the one titled MMB5. Transfer this to your machine using the File>Export/Transfer FCM File menu option (using your preferred transfer method) and cut one set. This will require one sheet of 12 x 12” patterned paper. These are the decorative panels for the outside and inside of the cover – MMB1.
Step 7
Hide and lock all layers except the one titled MMB6. Transfer this to your machine using the File>Export/Transfer FCM File menu option (using your preferred transfer method) and cut two sets. This will require two sheets of 12 x 12” patterned paper. These are the decorative panels for the book pages – MMB2. You will end up with a total of eight panels: one for each side of the page.
Step 8
Hide and lock all layers except the one titled MMB7. Transfer this to your machine using the File>Export/Transfer FCM File menu option (using your preferred transfer method) and cut two sets. This will require two sheets of 12 x 12” patterned paper. These are the decorative panels for the page inserts – MMB3. You will end up with a total of 8 panels: one for each side of each insert.
Step 9
Hide and lock all layers except the one titled MMB8. Transfer this to your machine using the File>Export/Transfer FCM File menu option (using your preferred transfer method) and cut one set. This will require one sheet of 12 x 12” patterned paper. These are the decorative panels for the page pocket/flap combinations from MMB4.
Step 10
Hide and lock all layers except the one titled MMB9. Transfer this to your machine using the File>Export/Transfer FCM File menu option (using your preferred transfer method) and cut one set. This will require one sheet of 12 x 12” patterned paper. These are the decorative panels for the reverse side of the page pocket/flap combinations from MMB4.
Step 11
Hide and lock all layers except the one titled MMB10. Transfer this to your machine using the File>Export/Transfer FCM File menu option (using your preferred transfer method) and cut one set. This will require one sheet of 12 x 12” patterned paper. These are the decorative panels for the flip-flap trios from MMB4.
Step 12
Hide and lock all layers except the one titled MMB11. Transfer this to your machine using the File>Export/Transfer FCM File menu option (using your preferred transfer method) and cut one set. This will require one sheet of 12 x 12” patterned paper. These are the decorative panels for the reverse side of the flip-flap trios from MMB4.
Step 13
Assemble as shown in the video.
If you make this, remember to tag in Brother on Instagram and Facebook, and myself on Facebook (and give us all a follow too)!


