How to set up your sewing machine

Getting a new sewing machine is exciting! So much that you’ll want to get sewing straight away. However, taking time to get to know your machine and setting it up properly means you’ll have a more enjoyable experience and will produce better finished results.
When you’re new to sewing, setting up and using a sewing machine can be a scary prospect if you’ve never used one before. Before you get lost wondering what all the buttons and leavers do, it’s best to read the manual first.
Not only will this show you where all the important parts of the machine are (and tell you their proper names), it’s also one of the best places to find useful operational basics – like how to thread your sewing machine properly, how to wind the bobbin and most importantly, how to keep safe when sewing.
Connecting to the power
All Brother home sewing machines operate via mains power. Take the power cable and plug it into the side of your sewing machine as instructed (usually on the right-hand side of the machine). Turn the power on at the wall and, using the on/off switch on the side of your sewing machine, you’ll now be able to turn it on and off.
Attaching the foot pedal
If you’ve bought a mechanical machine, or prefer to use a pedal when you sew, insert your foot pedal and plug it in where instructed. This is usually on the same side as your power cable.
Tip: If you’re using a computerised machine, you may have the option of sewing with or without a pedal. Some Brother computerised machines come with a Start/Stop button, which you can use instead of a pedal. However, it’s good practise to find out where and how to plug your pedal in, especially if you’re going to be sewing very small or fiddly makes where greater control is required.
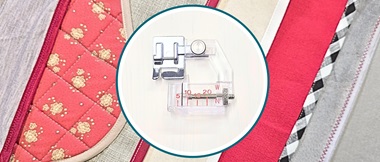
Check your presser feet
With your sewing machine turned off the next thing to do is check that your presser foot is attached. The presser foot is the attachment that keeps the material flat as you feed it through your sewing machine. Your machine may come with a selection of presser feet, all which have different roles.
You can raise the presser foot up and down in order to place your material underneath, or to change the presser foot. On mechanical Brother machines there will be a lever to the side of the needle shaft that you can raise up and down. On computerised machines you’ll find a button on the front of your machine marked with the icon of a presser foot, as well as the standard lever.


Insert your needle
Once you’re happy with your presser foot check that there is a needle inserted in your machine.
To insert or change a needle, choose a new one from the packet that comes with your machine. For standard sewing you’ll use a universal needle. However, for specialist sewing jobs and materials there are different types of needles. You can find out more about the different types of sewing machines needles, what they’re used for and how often you should change them here.
Take the small screwdriver out of your sewing machine accessories kit. On the needle shaft find the small black screw that is to the right of the top of the needle. Gently loosen this and insert a needle into the shaft, then tighten the screw so the needle is securely in place.
Tip: if you’re changing a needle, it’s a good idea to place a piece of material or paper under the presser foot. If your needle slips out of the shaft this will stop it falling into the feed dogs below and potentially damaging your machine.
Getting comfy
Not everyone has a craft room, or permanent space to sew, but you will need to set up your sewing machine on a steady, flat surface that you can sit at before you can start. As with any electrical item, there should be no running or standing water anywhere near your machine.
Make sure the power cable isn’t stretched too far and isn’t causing a trip hazard for yourself, or anyone else in your family!
If you’re using a foot pedal, you’ll need a space in which you can get your legs underneath the surface you’re working on, so you have enough room to operate the pedal smoothly and comfortably.
Threading your machine
Once you’re happy with your set-up and space, you are almost ready to sew! But, before you pull out your first project, there are still a few steps to go…
Threading is the most important part of setting up your sewing machine – if this is done incorrectly, it will lead to bad stitching results. All Brother sewing machines have easy to follow diagrams on the machine so threading is fuss-free!
First, you need to insert the bobbin. The bobbin holds the bottom thread that your machine sews with.
If your machine has a ready wound bobbin included in the accessories, pop the clear plastic window on your needle plate (with the presser foot up) and drop your bobbin in. Follow the diagram to make sure it’s inserted correctly and the thread is feeding the right way from the bobbin. Replace the window.

Take your spool of thread and place it on the little arm on the top of your machine. Thread your machine as per your manual guidelines – making sure the threads feeds the right way from the spool and goes through every step of the threading.

Some needles will need to be threaded by hand, however most new Brother sewing machines have a needle threader. This will either be a lever on the side of your machine, or a button on the front of your machine (with a needle and thread icon).

It’s time to sew!
As every machine is different it’s a good idea to do some test sewing first. This is also a good way to get used to the different stitches your machine comes with.Take a scrap piece of cotton and place it under your presser foot. Gently lower the presser foot and select the stitch you wish to sew. You can select your stitches either using a dial, buttons or screen, depending on which machine you have.

Ease your foot down gently on the foot pedal or press the Start/Stop button and sew. Once you’ve sewn a couple of stitches, press the reverse button (indicted by a curved arrow icon) and backstitch a couple of stitches to secure your work. Once you’ve completed the backstitches sew straight again.

Once you’ve come to the end of the line you wish to sew, backstitch a couple of stitches to tie off your work. Take your foot off the pedal. If your sewing machine comes with an automatic stitch cutter, press the button with the scissors icon on your machine – this will cut the thread so you can remove your work (after you’ve gently raised the presser foot lever).
If your machine doesn’t have an automatic thread cutter, first make sure your needle is in the upper position by either turning the handwheel on the right side of your machine towards you, or by using the needle up button. Then gently raise the presser foot and pull your work towards you and cut the thread using the thread cutter on the side of your machine.

Taking the time to properly set up and get to know your sewing machine will mean you’ll not only get the best out of your investment, you’ll also have fun doing so!