Glücksschwein good luck pigs


Join in the German New Year tradition of giving a Glücksschwein - a good luck pig, as a small gift at the turn of the year.
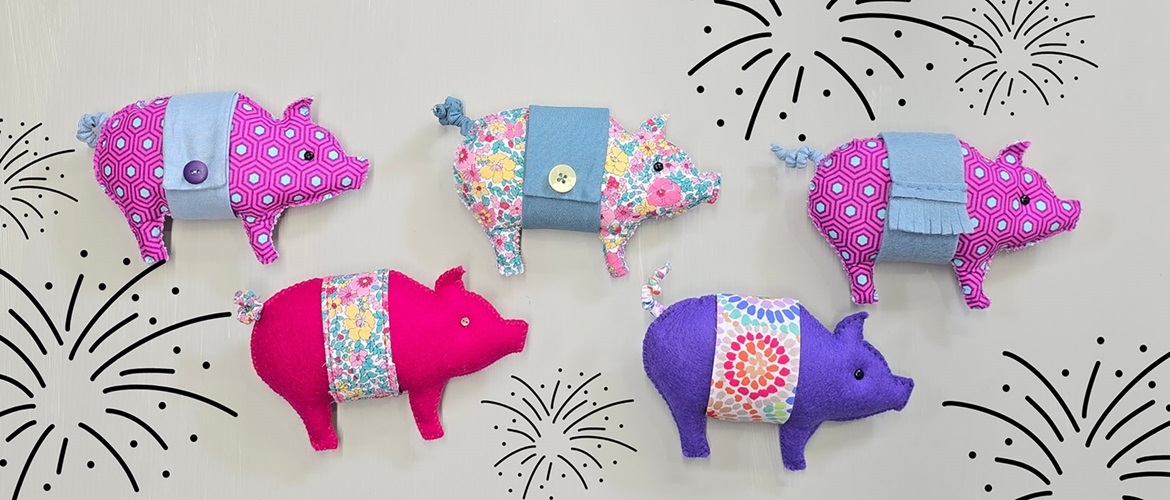
This sewn Glücksschwein pig has a cute curly tail and a sash around its belly, hiding the stuffing ‘wound’ with a decorative touch. As you only need small pieces of fabric this is a great opportunity to use up some scraps!
This free Glücksschwein sewing pattern can be made from nearly any fabric – we used felt and stabilised cotton.
Below we’ve supplied a PDF sewing pattern that can be cut with scissors, plus cutting files for your Brother ScanNCut (to save you a job!).
Finished size: approximately 14 x 9cm.
Download cutting files here
Download PDF sewing pattern here
Materials needed
- Fabric: one 25 x 18cm piece per pig (see notes about suitable fabrics)
- Soft and pliable fusible interfacing (if using thin fabrics which will fray): one 25 x 18cm piece per pig
- Thin cotton fabric in contrasting colour for tail: 3 x 15cm
- Fabric or ribbon for the sash: the finished size of the sash is 20 x 4cm. If using thin fabric, you need two pieces of 21 x 5cm. If using felt or thick fabric that will not fray, cut it to the finished measurement.
- Elastic: 0.5cm wide x 10cm
- Stuffing
- Two small beads or buttons for the eyes
- Matching sewing thread
- Optional: button or other decorations to add to the sash
Equipment needed
- Sewing machine
- Scissors
- Pins
- Loop turner
- Stuffing tool (a chopstick works well!)
- Point turner (optional)
- Iron and ironing surface
- Hand sewing needle
If cutting on the ScanNCut (optional, can cut with scissors)
- ScanNCut – any DX model
- ScanNCut DX machine with rotary blade and rotary blade holder
- Low tack mat
- Penholder and purple fabric pen tip
- Spatula
Notes
- Suitable fabrics: for the body, you can use almost any fabric with a fine weave or knit. If the fabric is soft, stretchy or frays, stabilise it with fusible interfacing.
- For the tail, use a soft fabric with a fine weave. Do not press interfacing to the tail piece.
- The sash can be made from any fabric. If you are using a thick fabric like felt, boiled wool or a coarsely woven fabric, one layer will be sufficient. Thin fabric should be sewn into a double-layered piece. A wide piece of ribbon will also work well for this part.
How to
Step 1
If using thin or stretchy fabric, or fabric prone to fraying, press interfacing to the wrong side of the large piece for the body.

Step 2
If cutting the Glücksschwein sewing pattern pieces with your Brother ScanNCut:
Download the cutting files for ScanNCut and send to your machine.
Insert the purple pen tip and select drawing – the eye position and tail position will be drawn.
Insert the rotary blade holder and blade and cut the two body pieces.
If cutting the New Year Glücksschwein sewing pattern pieces with scissors:
Download the PDF sewing pattern, print and cut out the paper pieces for the body. Pin to fabric, cut out and mark tail and eye positions.

Step 3
Make the lucky pig’s tail: use the strip of 3 x 15cm fabric. Fold lengthwise with right sides facing. Sew along the length with your sewing machine, 5mm from the fold.Trim to 3mm from the sewn line.

Step 4
Turn the Glücksschwein’s tail out using the loop turner.
Step 5
Now it’s time to add the elastic to your Glücksschwein pig’s tail. Insert the loop turner through the tail tube, insert the hook into the end of the elastic and make sure the latch hook closes.
Pull the elastic into the pig’s tail until the end of the elastic is level with the end of the tube. Pin through elastic and fabric tube and sew over the end to secure (keep the loop turner attached to the elastic while sewing in place!).
Tie a knot in the sewn end and pull it as tight as you can. The knot should sit at the end of the tube (see image below). Trim the excess fabric and elastic right next to the knot.
Using the loop turner (which should still be attached to the other end of the elastic), pull the elastic further through the tail tube until it just emerges from the open end. This will cause the sewn end of the Glücksschwein pig’s tail to curl. You can adjust the curl of the pig’s tail by pulling the elastic tighter or releasing it a little bit into the sewn fabric tube.
When you have found the point where the tail is curling the way you want it to, pin through elastic and fabric and sew over all layers to secure.

Step 6
Pin the flat end of the tail on the mark on the wrong side of one of the body pieces. Let the end that is not knotted extend into the body with at least 0.5cm.
Place the second body piece over the first – wrong sides facing. Pin all the way around on the inside of the body. You can add some clips around the edges too.

Step 7
Select a zig-zag stitch, width 3 and length 2. Sew all around the outside of the Glücksschwein pig’s body making sure to place the fabric so the needle pierces the fabric on the left side, but not on the right side of the zig-zag stitch. This is important as it will allow the stitches to flatten out when you stuff the pig. See image below as to how the stitches should fall on/off your fabric.

Step 8
In the centre of the body, separate the layers and make a small snip in the one layer of fabric. Insert the tip of the scissors and make a gap of approximately 2cm as shown on the PDF sewing pattern.

Step 9
Stuff the body: insert small pieces of stuffing first and using the stuffing tool push it into the snout, ears and legs. Stuff the head and body, pushing against the seams to flatten them out. Hand sew the opening closed.

Step 10
Make the sash.
If you’re using a thicker/non-fraying fabric, or ribbon: skip this step and go directly to Step 11.
If you’re sewing the sash together out of thinner pieces of fabric: place the fabric strips with right sides facing and sew a 5mm seam along the long sides and one short side. Snip the corners and turn the tube out, pushing the corners out with a point turner. Press.
You can sew some top stitching around the edges for a decorative touch and to help the fabric to lie flatter.
Step 11
Wrap the sash firmly around the Glücksschwein pig’s body, overlapping the raw edge with the finished end. Sew a button through all layers, catching a little of the pig with the stitches to keep the band in place.
If you do not want to use a button or a decoration, simply hand sew the finished edge to the band with slip stitches, catching some of the pig as well to keep the band in place.

Step 12
Following the eye marks on the Glücksschwein PDF sewing pattern, sew the beads or buttons in place from both sides, pulling the thread tight to form an eye socket. Tie off invisibly and bury the end in the body.


