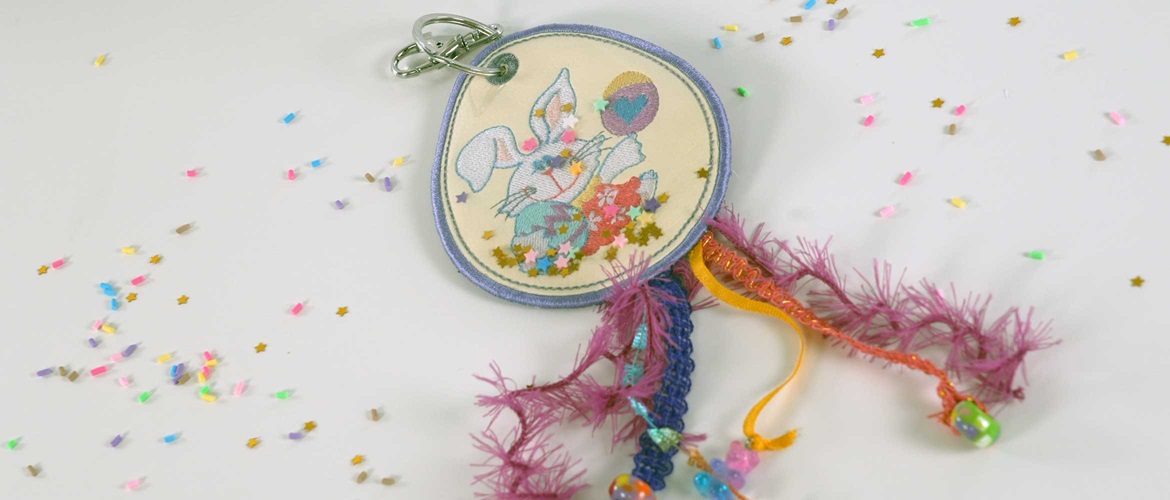
In-the-hoop Easter bag tag


Embroider a bit of spring magic with this sparkly Easter bag tag.
Our tag is made in-the-hoop on your Brother embroidery machine.
Finished size: 11.5 x 9.5cm
Materials needed
- Woven water-soluble stabiliser: two pieces of roughly 5cm longer and wider than the frame you will be using
- Coloured vinyl: two pieces of 15 x 12cm each
- See-through sew-in vinyl: one piece of 15 x 12cm
- Ribbons and charms of your choice for decoration
- Machine embroidery thread in a matching or contrasting colour
- Machine embroidery threads as needed for the designs you will add
- Bobbin thread
- Glitter or confetti of your choice – about ½ teaspoon full
- Key ring: minimum 2cm diameter
- Painter's tape or washi tape
Equipment needed
- Brother embroidery machine with a 100 x 180mm frame
- Artspira App on your mobile (optional)*
- An extra bobbin to wind embroidery thread onto
- Sharp, curved embroidery scissors to trim vinyl
- 4mm hole punch
Notes
- Each step in the provided free embroidery design has a different colour, so it is easy to differentiate. You can use the same colour throughout placement and tack down – the only stitches that will be visible in the end are the eyelet, satin stitch outline and running stitch line just inside the satin stitch outline. For those, you want to choose a colour that works with your design.
- Choose glitter or confetti that is not too fine.
How to
Step 1
Prepare a Brother embroidery frame with a double layer of water-soluble fabric.
Step 2
Using the blue button above download the free Easter egg embroidery design. Transfer design part 1 and part 3 to your Brother embroidery machine and save on the machine memory.
Step 3
Open part 1 of the free embroidery design.
This is the placement line and the tack-down for the vinyl.
Press SET.
Important: DO NOT move or change the scale of the design. If you move the design by accident, use the Move keys, press the dot in the middle of the arrows, and it will recentre the design to where it should be.

Step 4
Press ADD on your Brother embroidery machine’s screen.
You will now create Part 2 of the design – the embroidered images on the tag.
Place embroidery designs of your choice on the outline Easter egg shape, taking care that it is smaller than the outline.
You can use names, initials and simple designs with not too complex fill patterns from the built-in designs on your Brother embroidery machine or choose from thousands of designs on the Artspira app.
Important: arrange the elements without moving Part 1 of the design. If you think you have moved it, best is to exit, delete everything and start again or recentre part 1 by pressing the centre dot in the Move selection (see image below).

Step 5
Press ADD and select Part 3 from the imported free Easter egg embroidery files.
This will be the tack-down for the see-through vinyl and the backing vinyl as well as the satin stitch border and eyelet at the top.
Your Easter bag tag embroidery design is now complete, and you can start embroidering. Press on EMBROIDERY on your Brother embroidery machine’s screen.

Step 6
Load the embroidery frame into your Brother embroidery machine and sew the first shape. This is the Easter egg embroidery guideline for where to place the first piece of vinyl.

Step 7
Place the first piece of coloured vinyl over the Easter egg outline you have just stitched and sew the next step – the tack-down.

Step 8
Once the Easter egg tack down has been sewn continue to stitch out the images you chose and placed inside the oval shape.

Step 9
Remove the embroidery frame from the machine and turn it over, so the wrong side is facing up.
Place the ribbons along the centre bottom of the Easter egg embroidery, taping them down above and below the outline (see image below). Do not add charms at this stage.

Step 10
Return the embroidery frame to the machine and sew the next step. This is a tack-down line along the bottom of the Easter egg shape, which will keep the ribbons in place.

Step 11
Remove the embroidery frame from the machine and trim the ribbon ends inside the egg shape to approximately 1cm from the sewn line tack down line. Leave the long ends taped down.

Step 12
Place the second piece of coloured vinyl, with the right side facing up, on the back of the embroidery frame, so it covers the entire outline. Secure with painter's tape.

Step 13
Change your bobbin to the same embroidery thread you will be using for the satin stitch border and the eyelet.
Step 14
Place the embroidery frame back in the machine.
Sprinkle glitter or confetti in the centre of the design. Carefully place the see-through sew-in vinyl over the glitter or confetti, making sure it extends over the sewn outlines of the embroidered Easter egg.
Step 15
Embroider the first outline – a double run running stitch. (You can choose to do this in a colour different from the satin stitch, as it will be visible).
Embroider the next two running stitch outlines.
Embroider the eyelet, taking care to keep the glitter from getting caught in the stitches.

Step 16
Remove the embroidery frame from the machine. Remove the painter's tape from the vinyl at the back and trim close to the outermost outline stitch, taking care not to cut through the ribbons or embroidery.

Step 17
Turn your Brother embroidery frame over to the front. Trim the transparent vinyl and the coloured vinyl close to the outermost outline stitch of the embroidered Easter egg. Cut one layer at a time.
Tip: it is important not to stretch or move the stabiliser in the embroidery frame, or the satin stitch outline will not align with the other stitches. To prevent this, lay the frame flat on the table and use curved scissors to trim.

Step 18
Return the embroidery frame to your Brother embroidery machine and sew the satin stitch border.

Step 19
Remove embroidery frame from the machine and remove the finished Easter egg bag tag from the frame. Trim the stabiliser away close to the stitching, taking care not to snip through the stitches!
Use a cotton bud and some water to dab away the leftover water-soluble stabiliser. Take care not to let too much water seep into the piece, as it will distort it.

Step 20
Using a 4mm hole punch, punch a hole in the centre of the embroidered bag tag’s eyelet.

Step 21
Insert a ring at the top of your embroidered Easter bag tag and tie some ribbons around it.
Attach beads and charms to the ribbons at the bottom and trim to your taste.
And your tag is now finished!

I hope you love your bag tag and are inspired to make many of them! Eggs aren’t just for Easter, so why not make personalised versions for friends’ birthdays, special events, or just the different seasons of the year?!