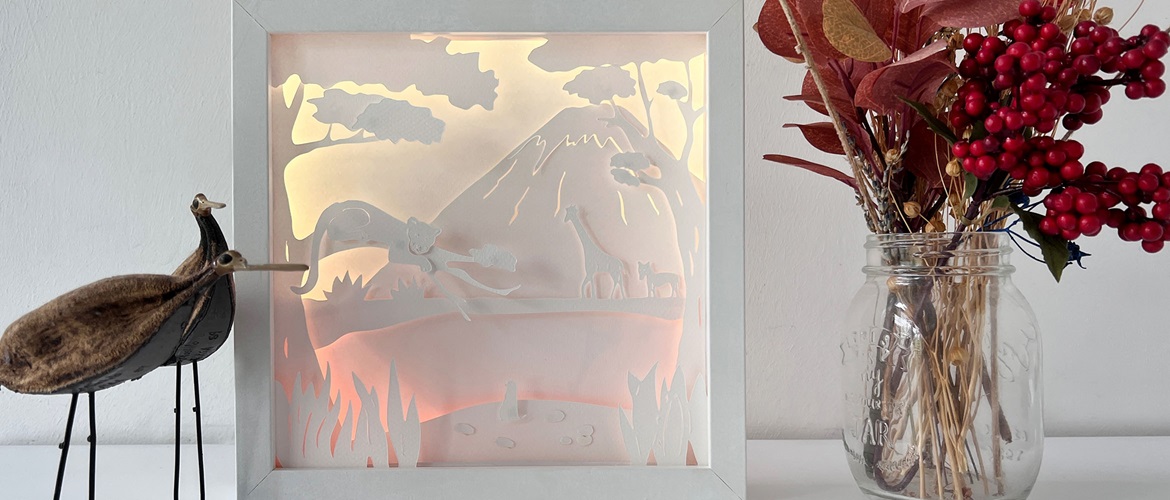
Enchanting 3D ScanNCut lightbox


Create this dreamlike lightbox on your ScanNCut.
Using card, LED lights and a box frame it makes a beautiful decoration or can be used as a night light.
Plan some time to make your lightbox, because the details are delicate, and you should work carefully.

Materials needed
- White cardstock of at least 160gsm: nine sheets of 25 x 25cm each
- Light-weight foam board (KAPA board) in 3mm thickness: one piece of approximately 12 x 23cm
- Double-sided adhesive tape - maximum 5mm wide
- Washi tape
- 3D adhesive dots (or foam pads)
- Self-adhesive LED strip lights, approximately 2m long
- Picture frame: choose a deep, square, box like style, at least 4.5cm deep and with inside measurements of 23 x 23cm, excluding glass or rear panel
- 1 piece of thick cardboard, approximately 230gsm: 23 x 23cm to cover the back
Equipment needed
- ScanNCut machine – Any model with appropriate standard blade
- Low tack adhesive mat appropriate for your ScanNCut model
- Weeding tools (spatula and hook)
- Scissors
- Short ruler
- Craft knife
- Metal ruler to use with craft knife
- Cutting mat
- Pencil
Important information to keep in mind when you choose your picture frame
The inside measurement: The cutting files supplied measure 23 x 23cm to match our frame as above. If your frame is a different size, you need to resize the cutting files accordingly. Remember to cut your pieces of card into appropriate sizes for your frame as well.
The depth of the frame: The sum of all the layers need to fit within the depth of the frame. In our example we did not use the glass sheet in the front of the frame, but if you want to use it, remember to take the thickness of the glass into account.
Note
It is very important that everything is fixed on top of each other as precisely as possible. If some pieces are misaligned, the picture will be wider or higher than 23cm and it would no longer fit in the frame! If your paper and foam ‘sandwich’ does not fit in the frame, carefully cut away the excess material with a very sharp paper scalpel.
How to
Step 1
Download all nine files and send them to your ScanNCut machine. Download the overview image and print in colour.Check your cut settings: cut speed should be set to 1 (lots of very fine details to cut!). The cutting pressure depends on your paper. Test which pressure is most suitable (4 worked for me).

Step 2
Cut all nine designs from the white cardstock.Tip: during cutting you can press pause and, to be on the safe side, attach more washi tape across the already cut border pieces to prevent the paper from slipping when the outer contours are cut.

Step 3
Carefully remove the cardstock from the cutting mat using the spatula.
Step 4
Weed the details with the hook. Make sure all the excess card is removed from the design.

Step 5
Mark 10 pieces of 0.5 x 22cm and 10 pieces of 0.5 x 23cm strips on the foam board and cut them with a cutter on the cutting mat.
Step 6
You are now ready to assemble! The paper layers are glued from the back (layer nine) to the front (layer one). There are no foam strips between layers nine and eight, eight and seven and seven and six.
There are foam strips between layers six and five, five and four, four and three, three and two and two and one.
Attach double-sided tape to the edge of layer nine, remove the protective film with the hook and fix layer eight on top of it.

Step 7
Fix layers 7 and 6 in the same way, making sure they fit exactly on top of each other.

Step 8
Stick adhesive tape all around the edge, then add foam strips (the ones you have cut in step 5) around the edge: stick one 23 cm long strip to the top edge and one to the bottom edge, then add a 22cm long one to the right-hand side and another to the left-hand side.

Step 9
Fix double sided tape all around on top of the foam strips.

Step 10
Add paper layer five (the mountain) on top.

Step 11
Repeat with tape, then foam strips, and again tape and layer four.
Repeat this sequence of tape, foam, tape and next layer until layer one is mounted.

Step 12
Finally, fix the small elements from layer two and one using the 3D foam pads or glue dots. Place the leopard, treetop parts, meerkat and stones in position and glue carefully. Since the stones are so small, I recommend using double sided tape here instead of foam pads.

Step 13
When everything is mounted, turn the sandwich over and carefully insert into the frame until the front of the picture is pushing against the front of the frame. If you want to use the glass of the frame, clean and insert that first.

Step 14
Stick the light strip to the inside of the frame. Position it all around, behind the paper picture, removing the protective film as you go. Cut the strip at one of the designated locations marked on it.

Step 15
Measure the width and height of the light strip connection point and transfer these measurements to one corner of the heavy card piece. Cut a window into the cardboard. Insert it behind the picture and light strip in the frame and bend the clips on the frame over to secure the backing in place.

Step 16
Finally, switch on the light strip and set the desired colour - done!

I can’t wait to see what you make! Remember to tag in Brother on Instagram and Facebook, and myself too! You can also find Brother on Pinterest and YouTube for even more inspiration.


