How to: use Brother cording feet

Cording feet can be used to embellish clothing and household items with up to seven decorative strands of thread.
These threads, or cords, are threaded through the holes or the spring mechanism of the sewing machine presser foot, holding them in place while you sew over them with decorative stitching. This is such a fun way to add detail to your project - the possibilities are endless!
Accessory snapshot

Brother 5-hole cording foot F019N
Brother 7-hole cording foot F020N
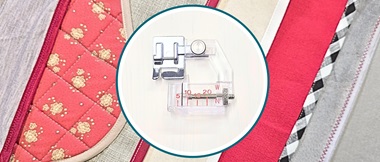
Brother cording foot (3 cord guide) 5mm F013N
Brother cording foot (3 cord guide) 7mm F024N
What is the difference between Brother’s cording feet?
The number of threads that can be sewn together, the size of the openings in the presser feet and the width of stitch one can achieve.
Cording feet with holes
The Brother 5-hole and 7-hole cording feet look almost the same. Both have little holes through which you thread the cords before attaching the foot to the machine.
The obvious difference is the number of holes! On the 5-hole foot there are three holes at the back and two holes in front, offset so you will get five strands lying equally distributed when sewn. The total width of the holes is around 5mm.
The 7-hole foot looks just like the 5-hole foot but has seven holes – three at the back and four in the front. The total width of the holes is 7mm.
Some sewing machines can only sew a maximum of 5mm wide, therefore make sure to check which foot is compatible with your sewing machine on the Brother Support site.

How to use the 5-hole or 7-hole foot
Step 1
Feed the selection of threads you want to use through the holes from the front to the back. A needle threader (the type used for hand sewing) is a major help. Once you have all the threads through the holes, tie them together behind the foot and attach the cording foot to the sewing machine.

Step 2
Select the decorative stitch you want to use and set it to the correct stitch width and stitch length. The needle thread can blend in with your cords, or you can use a contrasting thread. The bobbin thread will not be visible, so you can match it to the colour of the fabric you are sewing on.
Step 3
Position the fabric under the presser foot. Pull the knotted threads backward for about 10cm, bring the presser foot down and start sewing.
Step 4
When you are done, remove the item from the machine, and snip the decorative threads about 10 cm from the last sewn part. See our tips for finishing off below.
Cording feet with guides

These cording presser feet have a spring mechanism with three little gaps for the cords to feed through. On the bottom, there are guides to keep the cords in the correct position.
The difference between these two feet is the size of the gaps and the space between them. The 5mm version has smaller gaps, and when three threads are fed through the width of the resulting stitch is 5mm. The 7mm version has larger gaps, so thicker cords can be used, and the total width of the resulting stitch is 7mm.
How to use the cording feet with guides
Step 1
Attach the Brother cording foot with guides to your sewing machine. Position the fabric under the presser foot. With the presser foot raised, start to feed the cords from the right to the left into the foot, under the spring-loaded metal strip.
Start with the cord/thread you want to lie to the left. While holding the end of the thread behind the presser foot with your left hand, slide the thread through the first two gaps and let it nestle in the left-hand side gap. Repeat with the other cords, feeding them into the remaining two gaps.
Step 2
Follow instructions for the cording feet with holes from step 3.
What can you do with a cording foot?
You can add decorative edgings to just about any textile item. Think napkins, placemats, cushions, cuffs, collars, buttonhole strips on shirts, art quilts, quilt bindings, outlining appliqué shapes …. you get the idea! As you sew, the cords will follow your foot, so curves and even loops are no problem.
What can you thread through the slots or the holes?
Virtually anything that will fit through the holes or gaps and that will feed through smoothly will be OK to stitch through. Look around your sewing room for inspiration. We used knitting yarn, tapestry wool, pearl cotton in different weights, silk filament, metallic braid, metallic threads, stranded cotton, narrow ribbon and raffia to name a few.

What can you put in the sewing needle?

Any thread that will sew easily. Try with embroidery thread, normal sewing thread, top stitching thread and metallic threads of all kinds. Be sure to use the right needle for the fabric and thread that you are using.
Tip: we’ve got a handy blog post all about choosing the right needle for the right sewing, quilting or embroidery job. Read it here and make sure to bookmark it for reference!
How do I know how wide and long the stitch settings should be?
The width of the stitch should be slightly wider than the cords you have in the foot, so that they will be sewn down. There is no fixed rule, so try it out on a scrap of fabric until you get the right effect. It is not necessarily wrong if the needle stitches a little bit wider than the cords at the left or right – you could use this to add to the effect. Play around until you are happy with the result and then sew on your project.
How do I finish the loose ends after sewing?
If the ends will be enclosed in a seam, sew across the cords with a serpentine stitch, as wide as your cords and a short stitch length – about 1 or 1.5. Cut the cords. Do the tie off in the seam allowance, close to the sewing line, so you will not trim it off when you trim the seams when constructing your garment.
If it is a decorative line added to a shape or the edge of a finished item, tie off as invisibly as possible at the beginning and the end of the stitching. Thread each cord individually into a hand sewing needle and bury it in the seam or the back of the item, to hide it from sight.