How to use the Brother dynamic walking foot and interchangeable toe set

The Brother dynamic walking foot set (F085 & F086) makes it easy to sew difficult fabrics.
A walking foot adds the equivalent to feed dogs to the top side of your sewing for improved feeding.
With fabric being fed through the machine from both the bottom and the top simultaneously, you’ll get better results and have more control when sewing difficult fabrics.
Very thick fabrics will feed easier, and your stitch length will be more even. Layered fabrics, like a quilt sandwich, will be less likely to distort while sewing. Very thin and slippery fabrics will be less likely to pucker, and vinyl or thin leather will not cling to the presser foot.
Find out about the dynamic walking foot here
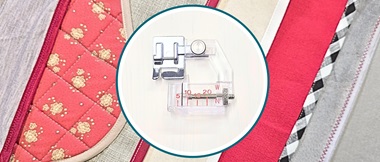
The Brother dynamic walking foot set comes with both closed and open toe attachments. To add even more functionality, we have developed the interchangeable toe set (F086) comes which comes with a quarter inch foot guide, stitch in the ditch foot and long quilting guide.
Find out about the interchangeable toe set here
How to attach the dynamic walking foot to your machine
Low shank machines
- Remove the presser foot holder from the machine – it is not necessary to remove the screw completely just unscrew it enough to release the presser foot holder.
- Bring the walking foot into position from behind the shank. Position the claw around the needle clamp screw. Hold it in position while twisting the bars of the walking foot around the shank bar and the screw. Fasten the screw securely. When you sew, the up and down motion of the needle will move the feed dogs of the walking foot.
High shank machines
Remove the presser foot holder as above but remove the screw completely. Insert an adaptor for screw-on feet (F010N). Fasten the screw securely.
How to change the foot plates
With the walking foot attached to the machine, raise the presser foot and gently push down on the foot plate. It will click loose from the walking foot. Attach a different plate by positioning the two little gaps on the foot plate below the pins at the bottom of the walking foot, and push the foot plate up, or gently lower the presser foot. The foot plate will click into position and should lift with the rest of the foot if you raise the presser foot.
How to attach the quilting guide to the walking foot
Toward the back of the walking foot there is a little black coloured gap. This is where you insert the quilting guide. Push the round bar into the hole – it will be tight – and carefully move it into the desired position. You can insert it from either side to have the guide on the right or the left of the foot.

What can you do with a Brother Dynamic walking foot and the different attachments?
- Standard foot plate attachment
- Soft and slippery fabrics or stiff fabrics which will have needle pull up.
- Any application where it is not essential to see the needle.

- Open toe foot plate attachment
- Applications where you would benefit from seeing where the needle is placed, for example top stitching or appliqué.

- Quilt piecing

4. Stitch in the ditch foot plate attachment
- Quilting between parts of a quilt.
- Attaching waistbands or cuffs.
- Decorative stitching in lines.

- When quilting or sewing a line parallel to another mark or row of stitching.
- The quilting guide can be used with any of the foot plate attachments.