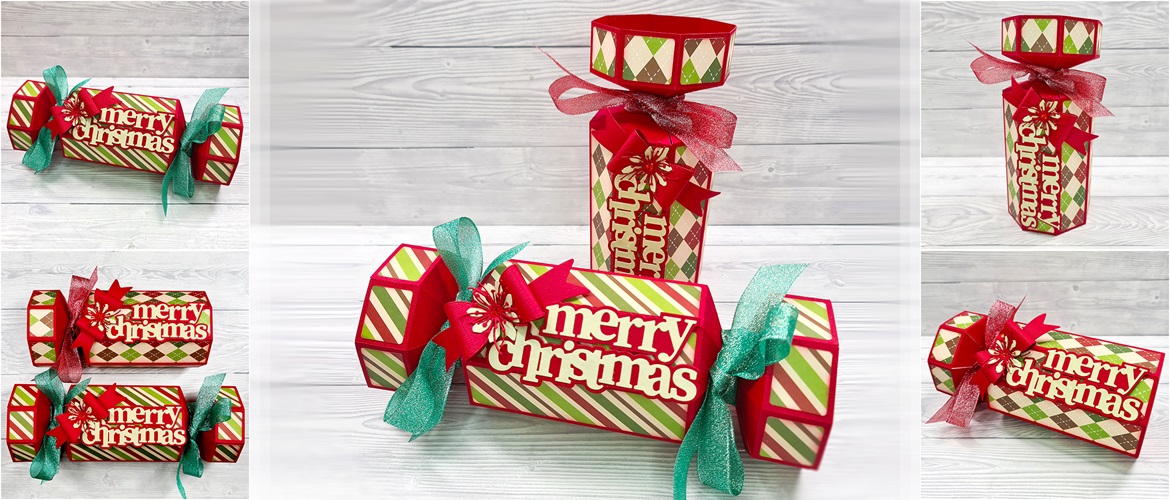
Christmas cracker gift box


Make gift giving fun and festive with this stylised, easy to make cracker gift box.
The gift box is available in two styles: a single-ended/flat bottomed version and a more recognisable double-ended alternative.
There is plenty of space inside for gifting too!
The gift box measures approximately:
- Style 1 (Single Ended) = 100 mm / 4 inches wide/deep by 220 mm / 8 ½ inches tall. Space for gifts is approximately 100 mm / 4 inches wide/deep by 150 mm / 6 inches tall.
- Style 2 (Double Ended) = 100 mm / 4 inches wide/deep by 275 mm / 10 ¾ inches tall. Space for gifts is approximately 135 mm / 5 ¼ inches wide/deep by 135 mm / 5 ¼ inches tall.
Materials needed
Paper/card
For style 1 (single ended) you will need:
- Three sheets of 12” x 12” cardstock. I recommend a smooth colour-core cardstock between 180gsm / 65lb and 210gsm / 80lb. Using thicker card may make the project difficult or impossible to assemble effectively.
- One sheet of 12” x 12” patterned paper. I recommend lightweight scrapbook paper for the decorative panels of this project.
For style 2 (double ended) you will need:
- Three sheets of 12” x 12” cardstock. I recommend a smooth colour-core cardstock between 180gsm / 65lb and 210gsm / 80lb. Using thicker card may make the project difficult or impossible to assemble effectively.
- One sheet of 12” x 12” patterned paper. I recommend lightweight scrapbook paper for the decorative panels of this project.
You will also need
- Bookbinding glue or low tack/quick grab glue
- Assorted embellishments
- Some lengths of ribbon or twine for decoration
Please note: the instructions below are for the basic cracker. You can freely embellish to your liking by adding elements such as text, 3D decals, cut outs, foiling etc. The ScanNCut has a wide range of built-in designs, fonts and applications for this purpose. Additionally, you can find thousands of extra cutting files on the Brother Artspira design app. Have fun!
Equipment needed
ScanNCut - hardware
- Brother ScanNCut – any CM Model
- Standard mat [CAMATSTD12]
- Standard blade [CABLDP1] and blade holder [CAHLP1]
OR
- Brother ScanNCut – any SDX model
- Standard mat [CADXMATSTD12]
- Standard auto-blade [CADXBLD1] and holder [CADXHLD1]
ScanNCut - software
- CanvasWorkspace for PC or Mac
Download cutting files here
How to
Step 1
Download the CanvasWorkspace project file. Open it in CanvasWorkspace (the desktop version). Open the layers tab on the right.
Step 2
To make style 1 – the single ended cracker
Hide and lock all layers except the one titled 1-1. Transfer this to your machine using the File>Export/Transfer FCM File menu option. Cut twice from 12 x 12” cardstock.

Step 3
Hide and lock all layers except the one titled 1-2. Transfer this to your machine using the File>Export/Transfer FCM File menu option. Cut once from 12 x 12” cardstock.

Step 4
Hide and lock all layers except the one titled 1-3. Transfer this to your machine using the File>Export/Transfer FCM File menu option. Cut once from 12 x 12” cardstock.

Step 5
Assemble as shown in the video.
Step 6
To make style 2 – the double ended cracker
Hide and lock all layers except the one titled 2-1. Transfer this to your machine using the File>Export/Transfer FCM File menu option. Cut once from 12 x 12” cardstock.

Step 7
Hide and lock all layers except the one titled 2-2. Transfer this to your machine using the File>Export/Transfer FCM File menu option. Cut twice from 12 x 12” cardstock.

Step 8
Hide and lock all layers except the one titled 2-3. Transfer this to your machine using the File>Export/Transfer FCM File menu option. Cut once from 12 x 12” cardstock.

Step 9
Assemble as shown in the video.
If you make this, remember to tag in Brother on Instagram and Facebook, and myself on Facebook (and give us all a follow too)! You can also find Brother on Pinterest and YouTube for even more ScanNCut inspiration.


