How to: use the Brother Adjustable Binding Foot

Adding binding or a folded braid to the edges of tableware and clothes adds a professional finish but sewing it on neatly can be a struggle. This genius sewing presser foot from Brother makes it easy.
The Brother Adjustable Binder Foot will keep binding or tape folded evenly while you’re sewing. The item you want to add the binding to is fed into the gap between the legs of the U-shaped section of the presser foot, so the tape is sewn neatly and evenly onto the edge.
The U-shaped section of the Brother Adjustable Binding Foot can be adjusted to accommodate wider or narrower tape. In addition, this sewing presser foot can be moved from left to right so that the stitching sits in the correct place on the binding.
With this Brother sewing presser foot you can attach binding from 5mm to 20mm wide.
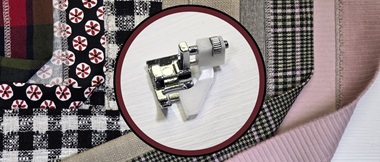
Accessory snapshot

How to use the Brother Adjustable Binder Foot F071
Step 1
Holding the Brother Adjustable Binder Foot in your hand, thread the binding through the U-shaped opening. Pull it at least 10cm through to the back of the sewing machine presser foot.

Step 2
Straighten the tape and align the edges with the left edge of the presser foot’s guide. Make sure the two edges of the tape are nestled into the two little grooves of the Brother Adjustable Binder Foot.
Tip: pin the folded tape extending at the back of the presser foot together. This is especially helpful if the tape was not pressed double.

Step 3
Adjust the width of the opening of the sewing machine presser foot by turning the screw on the right bottom side (marked B in the snapshot image at the top of this article).
The folded binding tape should fit into the U-shaped opening snugly, but without puckering. When you pull on the end of the tape it should slide through the gap in the Adjustable Binding Foot smoothly with a tiny amount of resistance.
If the tape begins to twist when you are pulling it though, the screw is too loose – please tighten it and try again.
If the tape begins to create extra folds when you are pulling it though, the screw is too tight – please loosen it and try again.

Step 4
Attach the Adjustable Binder Foot to the presser foot holder on your Brother sewing machine.
Step 5
Select the stitch you wish to use to sew the binding on with. Carefully sew through one unit of the stitch to see if the placement of the stitches is correct.
If not, you can adjust the sewing position by loosening the top screw (marked C on the snapshot image at the top of this article) and moving the position of the Brother Adjustable Binding Foot to the left or the right. You can also adjust the needle position if your sewing machine is equipped with that function.

Step 6
Insert the edge of the item you are sewing the binding to between the two rolled plastic parts of the Brother Adjustable Binder Foot. These are the two legs of the U-shaped opening. Push it in as deep as it will go while still staying flat.
Tip: tweezers or a stiletto work well to make sure the edge of the item is well placed within the sewing foot.

Step 7
Lower the presser foot on your Brother sewing machine and sew!

What kind of binding can I use with the Brother Adjustable Binder Foot?
You can use bias binding, thin webbing, ribbon or fold-over elastic. This style of sewing presser foot will fold the binding lengthways in two. The edges of the tape should be finished (like the edge of a ribbon) or folded (like the edges of prepared bias binding).

How should I prepare the edge of the item to be bound?
Make sure the edge is cut smoothly and does not have long frayed ends. If it consists of multiple layers, join them with stitching along the edges through all the layers.
Where can I use the Brother Adjustable Binder Foot when sewing?
Here are a few suggestions of where you could use the Brother Adjustable Binder Foot:
- For a professional finish add a narrow satin binding to the edge of a bridal veil, a tulle skirt or the edges of lace curtains.
- For a luxurious feel, attach a wide satin binding around a blanket.
- Finish the edges of facings on garments with a neat bias binding.
- Attach fold-over elastic to mesh fabric when making bags.
- Use fold-over elastic to finish necklines and sleeve openings on knitted garments.
- For a neat look, bind the edges of placemats, hats, cushion covers and quilts.