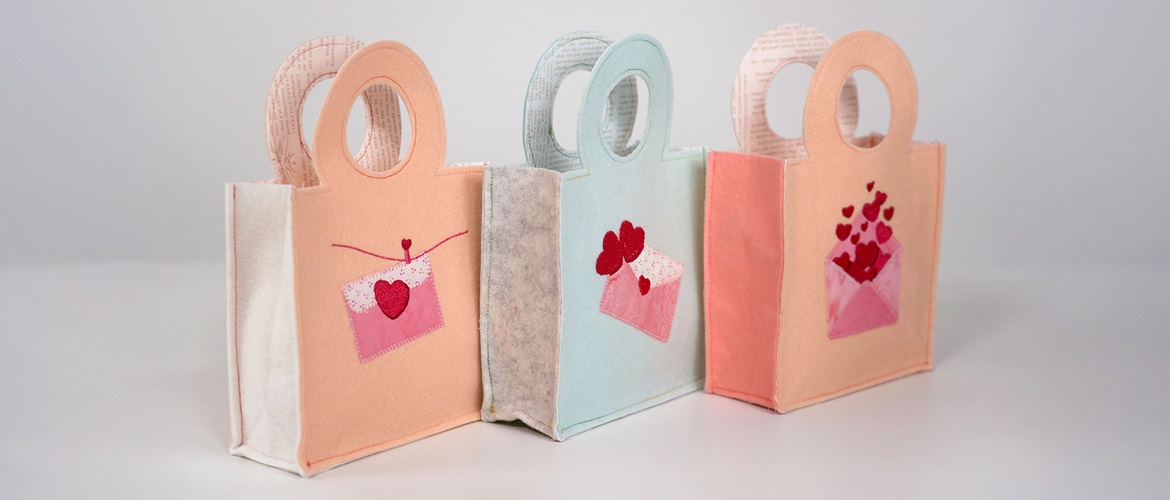
Valentine’s gift bag with embroidery


Surprise someone special this Valentine’s day with a self-made gift bag.
This project employs all three of your Brother crafting machines: use your embroidery machine to embroider the images, your ScanNCut to cut the pieces for the cute little bag and your Brother sewing machine to sew the bag together.
Don’t have a Brother embroidery machine? Cut out the Valentine’s gift bag pieces with your ScanNCut and sew together with your Brother sewing machine.
Don’t have a Brother ScanNCut? Embroider the felt bag pieces and cut by hand using the PDF files, then sew together using your sewing machine.
We’ve provided three free Valentine’s embroidery designs, so choose the one that illustrates your feelings the most – or why not make all three?
Download embroidery patterns here
Download cutting files for bag here
Download PDF file for bag pattern here
Materials needed
- Felt: for each bag you will need three sheets of A4 size each. Have fun mixing and matching colours!
- Machine embroidery thread and bobbin thread
- Fabric scraps for appliqué: approximately 20 x 20cm each or two shades or patterns
- Tearaway stabiliser
- Top stitching thread: use any machine thread that is a little thicker than normal sewing thread. I used variegated thread for a fun effect.
- Quilting weight cotton fabric: equivalent of three A4-size sheets for each bag
- Brother Iron-On Fabric Appliqué Contact Sheet: one roll is sufficient for two bags
Equipment needed
- Brother embroidery machine
- Brother sewing machine
- Brother ScanNCut machine – any DX model - with rotary blade attachment
- Low tack cutting mat
- Iron and ironing surface
- Curved appliqué scissors
- Pins and fabric clips
- Hand sewing needle
Notes
Finished size of bag: 19cm high, 15cm wide and 6cm deep.Embroideries will all fit in a 10 x 10cm frame.

How to
Step 1
Download the Valentine’s envelope embroidery patterns and transfer them to your Brother embroidery machine.
Step 2
Stabilise a sheet of felt with tearaway stabiliser and hoop. Load the embroidery frame into your Brother embroidery machine and follow the prompts for the appliqué and for the embroidery. Place the embroidery in the bottom one third of the felt sheet.
Tip: if you need a refresher on how to appliqué on your embroidery machine, click here to read our guide on how to use a digitised appliqué pattern.

Step 3
Remove the embroidered felt from the frame, tear off the stabiliser and press the felt and embroidery.
Step 4
Cut three A4-sized pieces of cotton fabric and Brother Fabric Appliqué Contact Sheet.
Fuse each piece of contact sheet to the wrong side of a piece of cotton fabric.
Peel the backing off and then fuse one piece to the wrong side of the embroidered piece of felt. Fuse the other two pieces to a sheet of blank felt each.

Step 5
If you’ll use your Brother ScanNCut to cut your felt pieces, follow steps 5 – 7.
If you’ll cut the felt pieces by hand, download the PDF, cut the relevant pieces and skip to Step 8.
Download the Valentine’s gift bag cutting file and transfer it to your ScanNCut. Save the file to your machine and then delete the three rectangular pieces, leaving just the gift bag cutting data.
Adhere the embroidered piece of felt to the cutting mat with the embroidery facing upwards.

Step 6

Step 7
Cut another gift bag piece from the blank fused felt and fabric piece.
Call up the original design you saved on your machine and delete the bag cutting pattern (leaving just the rectangles).
Cut the three rectangle gusset pieces from the remaining piece of blank felt and fabric that has been fused.

Step 8
Increase the stitch length to 3.
On both Valentine’s gift bag pieces, top stitch around the top edge of the bag and around the inner and outer edges of the handle.

Step 9
Join the third gusset piece to this piece to form a long piece consisting of three gusset pieces, joined with two seams.

Step 10

Step 11
Pin and sew from the top to 5mm from the end of the first gusset piece. (The end of this seam will meet exactly with the point where the seam joining the two gusset pieces ends.) Tie off securely, leaving long tails of bobbin and needle thread at the start and end.

Step 12

Step 13

Step 14
Add a little gift and you’re ready to send this to the one you love – will you send it anonymously?