How to use the Brother Fringe Foot

The Brother Fringe Foot was originally designed to make tailor’s tacks on garments. But did you know that it also lets you create looped fringing, chenille effects and raised stitching for decorative touches on garments, houseware and art quilts?
With a simple zig zag stitch, a few setting adjustments and this unassuming little foot you can create 3D flowers, heirloom seam joins, surface texture and custom trims.Accessory snapshot

How to use the Brother Fringe Foot
Step 1
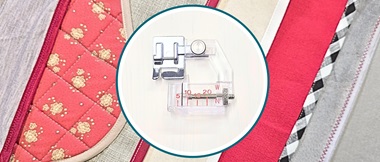
Clip the fringe foot onto the shank of your machine. Thread the machine and bobbin normally. (See our tips for thread and needle selections below).
Step 2
Select a single zig zag stitch or, for a more voluminous effect, a triple zig zag stitch.

Step 3
Change settings as follows:
- Stitch width at maximum
- Stitch length very short, but not 0
- Top tension at 0 or very low

Step 4
Turn the flywheel slowly by hand to make sure that the needle is not hitting the presser foot. If all clear, start sewing: the top thread will loop over the bar in the centre of the fringe foot.Step 5
When sewing is done, pull the work gently to the back to release the last few loops from the foot when you remove the fabric from the machine.On the wrong side of the fabric, you may see some of the top thread pulled to the wrong side – this is OK.
This bulky stitch could be left as is, sewn down the centre to create a plaited effect or you can continue to Step 6 to create a fringe, or to Step 9 to create chenille.

Step 6
To create a looped fringe.Change to an open toe foot (F027N or F060) and switch to straight stitch with the needle to the left.
Set the stitch length to 1 or 1.5. Sew across the row of raised stitches, catching them along the edges. If the fringe is going to be on a garment you can do another row of straight stitches to secure the loops.

Step 7
On the wrong side, remove the bobbin threads.
Step 8
Use an awl to tease the loops through the fabric to the right side.

Step 9
To create chenilleFollow Steps 1 – 5.
Change to an open toe foot (F027N or F060) and switch to straight stitch with the needle in the centre.
Set the stitch length to 1 or 1.5. Sew across the row of raised stitches, catching them along the centre. Do another row of straight stitches to secure the loops.
On the wrong side, remove the bobbin threads (like explained in Step 7).
From the right side, using an awl, tease the loops to the right side on both sides of the straight securing stitches (as explained in Step 8).

Thread and needle choices
- Fluffier and bouncier thread will create fuller fringes. We used wool embroidery thread, metallic thread, top stitching thread and embroidery thread to create different effects.
- In your bobbin, strong, smooth thread, like polyester embroidery thread, is easiest to remove. Use a contrasting colour so it is easy to distinguish between your main thread and the bobbin thread.
- Use a needle with a large eye, like a top stitching needle, especially for decorative threads.